
1. Screen Layout
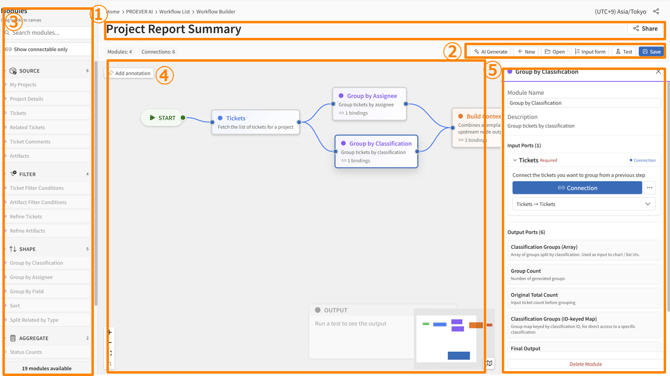
This section explains the screen layout of the Workflow Builder.
| No | Item Name | Description |
| ① | Page Header | The area where you can view the workflow name, copy the URL, and manage sharing settings. |
| ② | Toolbar | The area where you can create new workflows, generate workflows with AI, run test executions, load saved workflows, and save your progress. |
| ③ | Module Palette | The area where you can search for modules to add to your workflow by category or keyword. |
| ④ | Canvas | The workspace where you can place and connect modules to build your complete workflow. |
| ⑤ | Settings Panel | The area where you can configure the input values and data passing methods for the selected module. |
2. Creating a Workflow
There are two ways to create a workflow. If you are new to this process, we recommend using "2.2 Generating Workflows with AI."
2.1 Creating a Workflow Manually
-
Access the Workflow Builder
Click [PROEVER AI] > [Workflow Builder] from the side menu. -
Select Modules
Drag and drop the required modules from the Module Palette onto the canvas.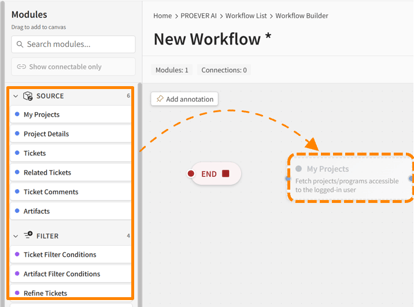
-
Connect Modules
Drag a line from the right edge of an upstream module to the left edge of the next module. Connect them so the process flows in order: [START] → [Module] → [END].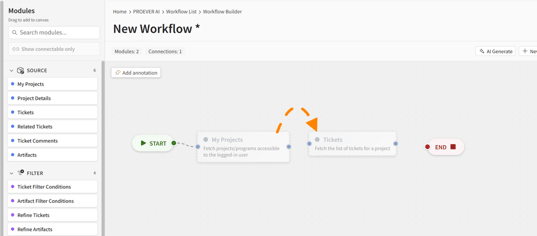
-
Configure Input Values
Select each module on the canvas and set up its input ports in the settings panel on the right.
Note: Simply connecting modules with lines does not pass data between them. To complete the data connection, go to the receiving module's settings panel and select the upstream module's output as the input port.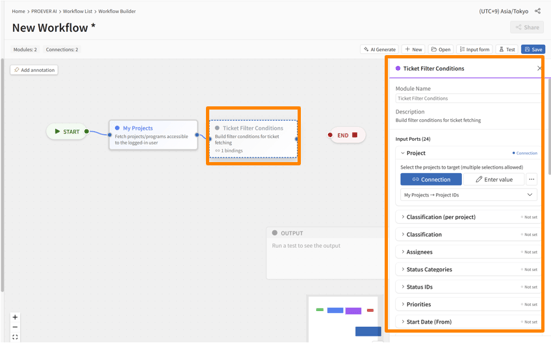
-
Verify the Workflow Flow
Ensure all modules are reachable from START and eventually reach END. If any settings are incomplete, a warning will appear. -
Run a Test
If needed, click [Test] in the toolbar to verify that the output matches your expectations. -
Save Your Workflow
Click [Save] in the toolbar, enter a workflow name and description, then click [Save].
2.2 Generating Workflows with AI
If you find manual creation challenging, you can generate a draft workflow simply by describing what you need to AI in plain language.
Generating workflows with AI consumes AI Credits.
-
Access the Workflow Builder
Click [PROEVER AI] > [Workflow Builder] from the side menu. -
Open AI Generation
Click [AI Generate] in the toolbar. -
Enter Your Desired Process
In the [Prompt] field, enter the process details and expected outputs, then click [Generate].
Note: You can also apply previous prompt history.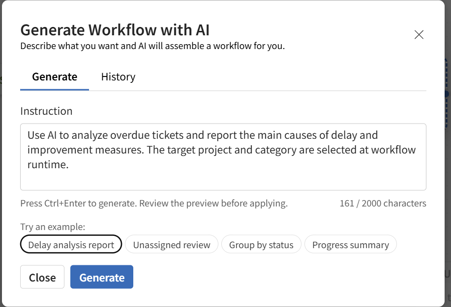
-
Review and Apply the Generated Workflow
Review the generated result. If it looks good, click [Apply to Canvas].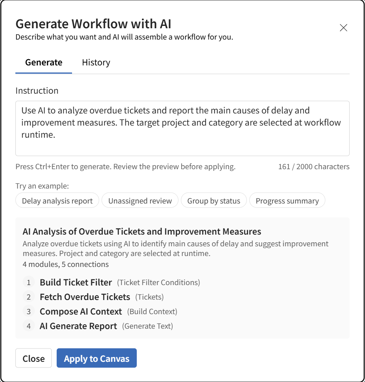
-
Adjust the Process Flow and Input Values
Review the flow of the generated workflow and adjust the configuration settings as needed. -
Save Your Workflow
Run a test to ensure everything works correctly. Click [Save] in the toolbar, enter a workflow name and description, and click [Save].
Important Notes on Workflow Creation
●Module Connection States
Connecting Lines
When you connect modules, the connecting lines will display in one of two states. If a gray dashed line appears, you must configure the input port on the receiving module to specify where it should receive data from.
| Type | Status | Example |
| Solid blue line | Data is currently flowing | 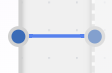 |
| Dashed gray line | No data is flowing | 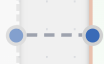 |
Module Displays
Each module has three different display states depending on its status.
| Type | Status | Example |
| Normal Display | Connected to preceding and succeeding modules, and actively receiving data. | 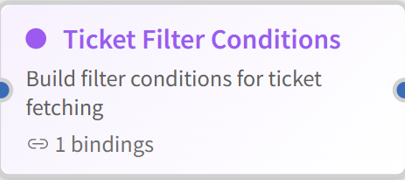 |
| Dashed / Faded Display | This module is not being used by any subsequent modules. | 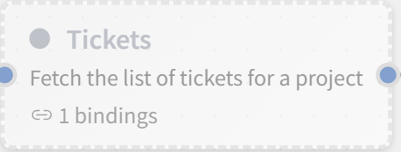 |
| Warning Display | Required input port settings or other configurations are missing. | 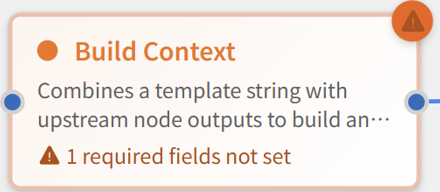 |
●Input Port Configuration
Input ports determine where values are retrieved from. There are three configuration methods available.
| Configuration Method | Meaning | Use Case |
| Connection | Receives output from the upstream module | When you want to use the result of a previous step |
| Enter Value | Set a fixed value | When you want to use the same value every time |
| Use Runtime Input | Input by the user at runtime | When you want to set a different value each time |
●Maximum Number of Modules
You can place up to 15 modules in a single workflow. Note: START, END, and OUTPUT nodes do not count toward this limit.
3. Editing a Workflow
You can edit workflows you have created directly in the Workflow Builder. You can also use an existing workflow as a template to create a new one.
-
Access the Workflow Builder
Click [PROEVER AI] > [Workflow Builder] from the side menu. -
Open a Saved Workflow
From the [Open] menu on the toolbar, select the workflow you want to edit and click [Open]. -
Edit the Loaded Content
Review the workflow loaded onto the canvas and make the necessary edits. -
Save Your Changes
From the [Save] menu on the toolbar, review the changes and click [Save]. Note: Check "Save as a new workflow" if you want to save your edits as a separate workflow.
4. Sharing a Workflow
You can share workflows you have created with other users in your workspace.
-
Access the Workflow List
Click [PROEVER AI] > [Workflow List] from the side menu. -
Select the Sharing Scope Click [Share] on the workflow you want to configure sharing settings for. Select the appropriate sharing setting:
- Only me
- Specific users/groups
- Entire workspace
Important Notes on Sharing Settings
- Only the creator can edit or delete a workflow.
- Users with whom a workflow is shared can execute it within the scope of data they have access to.
- Sharing a workflow does not share its past execution history.